A Step by Step Guide to Building Your First Garden Shed
Sheds can be an enjoyable way to express your personal style while also adding value to your home.
A strong foundation can protect your shed from settling unevenly and rotting, with options including gravel pads, concrete slabs or wood skids as foundation options.
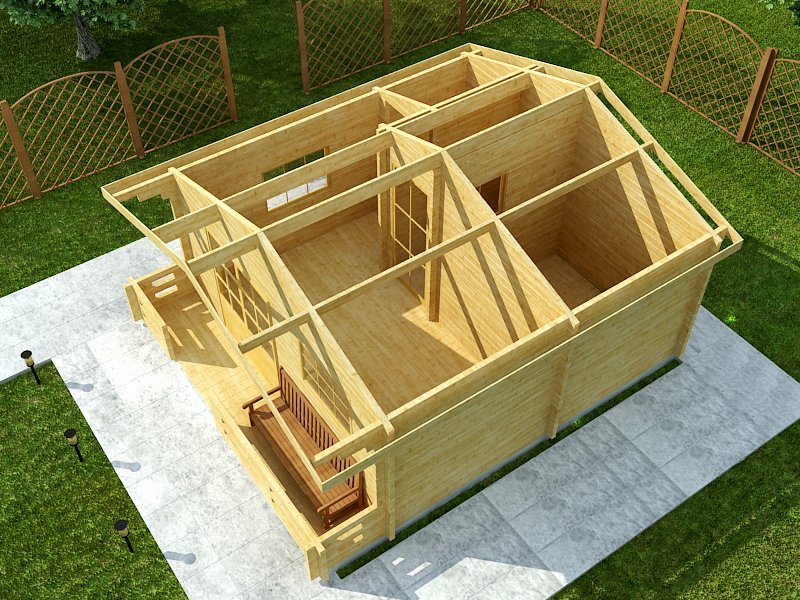
Create rectangular frames for walls based on your shed plan’s door opening sizes and cover them with plywood or OSB sheathing.
Determine Your Needs
As part of your decision process for selecting the size and features of a shed, begin by compiling a list of all of the tools, equipment, and other items you intend to store there. Depending on your gardening needs, a simple tool locker could serve your purposes well; or something larger may be more suitable.
Some municipalities require permits and setback restrictions when building sheds. You should familiarize yourself with your area’s regulations and requirements before beginning, including utility lines, easements and property zoning restrictions that must be considered.
Shape and style of a shed also determine its interior volume; low-peaked roofs offer more compact storage solutions while higher raked designs may offer additional headroom and storage space. Furthermore, depending on your local climate you may wish to consider whether your shed should be insulated or ventilated.
Sheds can be constructed using any number of materials. Wood is the most common choice, though plastic and metal sheds also exist. Each has their own distinct set of advantages and disadvantages; wood requires regular upkeep to reduce weathering and rot while remaining customizable, metal sheds tend to rust more rapidly over time, and plastic sheds lack aesthetic appeal when it comes to durability.
Add windows and doors to your shed as a great way to brighten the interior and increase visual interest, including window boxes or hanging baskets of flowers. Additional details, such as cupolas, shutters and window wells can also add extra charm and increase curb appeal.
As soon as your shed is built, the first step should be determining its foundation requirements and choosing an appropriate type. A well-tamped crushed-stone pad 6-8 inches thick can help small sheds withstand frost heaves effectively while larger structures require concrete slabs or piers as support structures.
After installing your shed, it’s essential to perform regular maintenance. In the fall and winter, remove leaves and clear away snow accumulation on the roof; while in spring use a hose or scrub brush with mild detergent to wash down its exterior. In addition, clean and ventilate the interior to prevent mold, mildew, or rot forming on floors or ventilate interior to avoid mold growth or mildew growth; additionally the shed should be secured to its base or anchor point and regularly inspected for moisture damage as moisture can lead to structural issues and affect stored items’ integrity if left unchecked.
Choose Your Materials
Garden sheds can be much more than simple spaces to store tools; with some creativity you can turn your shed into an inviting area where crafts, hobbies, or simply relaxation take place in peace and serenity.
Make your garden shed more aesthetically pleasing by painting or adding windows and skylights for natural lighting, installing insulation to keep the shed warm during the winter and cool during summer, customizing with workbench, pegboard or racks for power tools and adding lighting and outlets for easier use during stormy weather; decorating it with plants, flowers or artwork may add even more charm!
Building materials you select will have an enormous effect on both cost and overall functionality of your garden shed. While low-grade materials might seem cheaper at first, they can quickly become an expensive issue over time; for instance, inexpensive wood sheds can rot quickly due to moisture issues, insects or harsh weather conditions; in comparison with better quality resin or metal structures which will remain durable over time.
Skid foundations are an easy and straightforward solution for supporting sheds and other outdoor structures, thanks to their relatively straightforward construction. This form of on-grade foundation consists of long, straight concrete blocks arranged evenly along an on-grade area; then these foundation blocks support the floor joists of the shed.
Homeowners often find sheds to be an ideal location for raising chickens, as it can easily be modified with additional doors, roosting areas, nesting boxes and feed bins. Insulated and furnished with windows, tables chairs or other furniture to create a fully functional chicken house; having this space dedicated solely to raising and caring for chickens also contributes to mental wellbeing by providing purpose and self-reliance for caretaking duties.
Build a Base
Sheds typically serve as storage spaces for garden equipment and tools such as lawnmowers or shovels. Additionally, sheds may be used to house hobby tools, toys and other items that don’t fit within a garage’s confines.
A well-designed garden shed can add both function and beauty to the backyard landscape, adding value and making life simpler for you and your home. They can come in various designs from rustic barn-style structures to contemporary ones with plenty of windows – some even come equipped with amenities such as workbenches, shelving units and lighting for efficient workspace operations.
Some gardeners use their sheds as potting rooms, where they can complete projects like starting seeds, propagating cuttings and dividing plants for friends. Their shed can also serve as an area to pursue hobbies like woodworking or art and crafts – providing an oasis from distractions at home.
If your shed will serve more than storage purposes, installing a foundation is key to keeping it stable and upright as soil changes beneath. While crushed stone will work, for greater stability and durability consider sinking a frost-proof anchor into the ground instead. These long metal spikes can be found at most hardware stores; to install one in your shed’s base simply dig four holes at each corner and drive into position before bolting it to its framing – once set your anchor is ready.
Many homeowners opt to place their shed on a concrete pier or slab foundation, rather than the more conventional „on-grade” footing, in order to withstand heavier loads without shifting under extreme weather conditions. When building on slab, however, laying down plywood as waterproof surface should first be completed before pouring concrete on it.
Tile your floor to increase durability in your shed, using either clay tiles – which are both attractive and affordable – or OSB, which is water-resistant and highly durable. Tiling can be more involved than just laying some OSB sheets down, though, so be prepared to hire professional help and spend several hundred dollars.
Assemble the Shed
Garden sheds provide you with a space to store gardening supplies, tools and other items outside the house while serving as workshops for projects and crafts. Garden sheds also help to keep clutter out of the house and allow you to utilize tools more efficiently; there are various ways of customizing them depending on your needs and the work that will take place there.
Begin by selecting an ideal site for your garden shed. Preferably, the ground should be level and undisturbed by water or mud. Once laid, start building walls of your shed by pre-assembly each wall before installing onto its base garden shed. To save both time and labor costs, pre-assemble each wall before installing onto garden shed base.
Once your walls have been constructed, the next step in building is roofing the shed. To make this process simpler and reduce costs, plywood sheathing may be ideal; not only is it more affordable than traditional roofing materials but its durability against harsh weather conditions also makes it easier. In addition, there’s an array of sizes so finding one suitable to your shed should not be an issue.
Add louver gable vents in strategic spots around your shed’s opening to ensure proper airflow, keeping it cool and dry inside. After assembly is complete, painting it with all-weather exterior paint would also help ensure optimal performance.
If the cost and complexity of building your own garden shed becomes an impediment, purchasing one prefab from a garden center or home improvement store could be the ideal solution. Not only is this much faster and less costly than building it from scratch; in many cases prefabricated versions can even offer superior quality compared to custom-built structures.
However, building with a kit requires extensive planning, time, and basic DIY skills. Furthermore, as it does not include foundation preparation materials (ie poured concrete base), any on-site concrete preparation must also take place before adding the shed. As with any project of this nature it’s also crucial to discuss potential plans with neighbors first before acting upon them.